Quantcast
Channel: My Kitchen and Photography
Viewing all 94 articles
Browse latest View live

Homemade Creme de Cacao

$
0
0
 photo IMG_9839copycopy_zps4d664a76.jpg
This was my latest DIY project: Creme de Cacao. Actually I can buy creme de cacao at any liquor store but I enjoy making things from scratch, plus I am able to use the ingredients that has been sitting in the pantry for months.
Few of the recipes online used cocoa powder but I have a lot of cacao nibs so I've decided to look for a recipe that calls for cacao nibs. I found Serious Eats recipe much better.

homemade creme de cacao - recipe adapted from Serious Eats
2/3 cup cacao nibs
1 1/3 cup vodka
1 1/2 cups sugar
1 cup water
2 teaspoons real vanilla extract
  • Combine the cacao nibs and vodka in a sealable glass jar. Shake and then let steep for 8 days.
  • After the initial steeping period, bring the sugar and water to a boil. Let this syrup cool, then add to the jar along with the vanilla extract. Let steep for an additional day.
  • Strain out the nibs through a sieve and then filter through a coffee filter into the bottle or jar you'll use for storage.
 photo IMG_9840copycopy_zps0d9fceb7.jpg
Next project will be Creme de Menthe. ;-)

Espresso Cheesecake

$
0
0
 photo IMG_9854copy_zps8e0df416.jpg
This is the latest addition to Taart etc. menu. I've been planning to make this for quite sometime now but I couldn't find a perfect timing. Last week was Pieter's birthday and it was perfect because I also want someone to try it first before adding it to my menu. Everybody liked it. ;-)
 photo IMG_9850copy_zps4dd7d9bd.jpg
Belated Happy Birthday Pieter!  

New Hobby

$
0
0
 photo image_zps294aace3.jpg
I am playing with polymer clay lately. This was my first project: life size macarons and tiny macaron fridge magnet for my friend. This was also my first time to handle polymer clay. Although the packaging says "soft" they still have to be conditioned before being used.

What is conditioning?(www.jaedworks.com)
Conditioning is the process that makes polymer clay ready to work with. Most conditioning is done simply by working the clay with your hands until it reaches a good working consistency. The warmth of your hands combined with the physical process of stretching and compressing the clay changes its texture, making it softer and more pliable.

Doing this for several minutes made my fingers, wrist and palm really painful. The small ones are easy but the amount of clay that I used for the big macarons took time conditioning. On my next projects I will use the pasta machine, it's much easier and faster way and less pain to conditon the clay. I still need to practice more on how to handle and mold the clay because even after baking the appearance was still look uneven. But I am very happy with the finished product, specially with the colors I've chosen. Pastel color was really perfect for macaron, they are like pastel jewels inside my glass cake stand. So I guess from now on you will be seeing clay art in my blog. 
 photo image_zps694ebd17.jpg
 photo image_zps2f70bc73.jpg

White Forest Mousse Cake...Happy Birthday Alma!

$
0
0
 photo IMG_9955copycopy_zpsb73d9fac.jpg
I made this cake for my birthday. My original plan is only genoise sponge, cherry mousse and white chocolate mousse but since this is White Forest, I want to add more cherry flavor so I made another layer which is vanilla and kirsch bavarois. For me this was one of the best mousse cake I've ever made. Soft and moist sponge, light mousse, creamy vanilla and kirsch bavarois. Kirsch goes deliciously well with the vanilla. It was really delicious! I will make a Black Forest version of this next time. 
 photo IMG_9917copycopy_zps34163335.jpg
 photo IMG_9962copycopy_edited-1_zpsc1b6dbb0.jpg
Coco sent me a birthday card

Miniature Bakeshop

$
0
0
 photo image_zpsea0d7866.jpg
Pieter finally ordered a dollhouse for me. I am so excited to make a dollhouse bakeshop. These cuties are 2 1/2 cm in diameter, handmade by me using Fimo polymer clay and then oven baked. Still big though, next projects I will scale it down to 2 cm. I am also planning to sell polymer clay food accessories in Etsy. 

 photo ee012bb7-6606-4ec2-8721-4fd4435944f4_zps104ce44e.jpg
I made these black forest earrings for my friend.

Dollhouse Miniature Food 1:12

$
0
0
 photo image_zpsb254f158.jpg
Because of my new found hobby I haven't been in the kitchen this past few weeks. Haha believe me making this dollhouse miniature foods is so much fun. Today I finally completed the macaron tower for my dollhouse bakeshop. All I have to do is make a decoration to cover the big gaps. I also made Opera cake. I decorated the top with real gold leaf.
 photo image_zps2896eded.jpg
 photo image_zps26745d14.jpg
I will bake on Thursday, real cake hè. :-P

Back In The Kitchen...Fresh Orange Cream Tart or Should I Call It A Cake.

$
0
0
 photo IMG_0139copycopy_zpscaaa67c9.jpg
This was the second time I made Dorie Greenspan's Fresh Orange Cream Tart. As usual I made a shortcut: from sweet tart dough to digestive biscuit (again) and of course I cut down the quantity of sugar. The orange cream filling was indeed creamy even though I lessen the butter. Originally the butter used in the recipe was 2 3/4 sticks, creamy and super delicious but definitely not waistline-friendly.

How does it taste like after all the changes? soft, light, creamy, sweet and orangey...melt in your mouth goodness. The candied orange slices gives a nice touch as well.
 photo IMG_0130copycopy_zps1c4f0425.jpg
 photo IMG_0150copycopy_zps8ec9ee87.jpg
Dorie's instructions was to pour the cream into a container, press a piece of plastic wrap against the surface and refrigerate for at least 4 hours. When you are ready to construct the tart, whisk the cream vigorously to loosen it and then spread the cream evenly in the crust. What I did was I poured the cream straight to the prepared digestive biscuit, since I did not follow the instructions and the butter quantity my orange cream has air bubbles and it doesn't look like this. But for me it doesn't matter because it was still delicious.

Something like Macaron Tower and a late post about Sinterklaas

$
0
0
Photobucket
Something familiar? Haha yes! this is Ferrero Rocher's Christmas edition container that I got from Sinterklaas last Dec 6. The Sinterklaas feast celebrates the name day, Dec 6, of the Saint Nicholas (280–342), patron saint of children. Saint Nicholas was a Greek bishop of Myra in present-day Turkey.

Photobucket

Photobucket

Photobucket
He is a dutch version of Santa Clause but taller and slim.

Photobucket
Children in their Zwarte Pieten costume while patiently waiting for Sinterklaas to arrive.

Photobucket
Sinterklaas is assisted by many mischievous helpers with black faces and colourful Moorish dresses. These helpers are called 'Zwarte Pieten' (Black Petes). During the Middle-ages Zwarte Piet was a name for the devil. Having triumphed over evil, it was said that on Saint Nicholas eve the devil was shackled and made his slave. Although the character of Black Pete later came to acquire racial connotations, his origins were in the devil figure.

Photobucket
Zwarte Pieten are giving away candies and pepernoten to kids and adults. 
There's my big boy Pieter.

Back to my macarons. These are unfilled shells. Actually I made a macaron template which is the same size as ferrero rocher chocolate but after piping, the batter spread out and became too big for the holes. That is why I left them unfilled because if I do so it won't fit in the holes anymore.

source: wikipedia

Mango, Passion Fruit and White Chocolate Entremet

$
0
0
Photobucket
My plan is to practice for my taalcoach's raspberry and blueberry mousse cake for December 28 order. Lately, I got bored with berries flavored mousse cake that's why I've decided to make tropical flavor for a change. As you notice the genoise was too thin and small because I used 8" square baking pan and used 5" ring to cut it. I should have used bigger ring instead. But anyway, as what I have said this is just a practice. Next time I will make this again it will be perfect. I also enjoyed using the chocolate transfer sheet, it's not perfect yet but hey it's my 1st time.

Photobucket
from bottom: orange liqueur soaked genoise sponge, mango cream, passion fruit white chocolate mousse, mango mirror glaze, decorated with white chocolate and edible gold leaf.

p.s. did I mention it was delicious? ♥


Dollhouse Miniature Macaron Display 1:12 scale (or not :-P)

$
0
0
 photo image_zps9514f332.jpg
This is how my dollhouse counters look like now. Still a lot of space to fill but I finally completed the macarons, though I'm a bit disappointed because they are not small enough to my liking. It's supposed to be 5 mm (still big I think) but I don't like super fat macaron shells so I flattened them a little that is why it became 5.5 mm. I also made few pieces of 4 mm as I am thinking of doing the 400 pcs (200 pairs plus filling) macarons again. Oh well macaron fake or real it is really pain in the b*** haha.
 photo image_zpsa3f57880.jpg
 photo image_zpsa9dd4ba1.jpg
Each polymer clay macaron was individually handmade by me without the use of mold. I baked them in the oven.
 photo image_zpsb21ce36f.jpg

Jackfruit Pie

$
0
0
 photo jackfruitpie1_zps83dffc11.jpg
Yesterday was Pieter's day off. I promised him that I will bake something. The Jackfruit (in can) was sitting in the pantry for like 2 months now so I've decided to use it for this pie. The recipe was based on Dorie's fresh orange cream tart. I substitute the fresh orange juice to jackfruit puree and this time I bake a pie crust.

It was Pieter's 1st jackfruit and according to him it tastes really delicious. But for me I think it will taste even better if there are small bits of jackfruit in the filling.

 photo jackfruitpie2_zpsf4dcba92.jpg

crust - 9 inch pie tin
1 1/2 cups flour
1 stick butter + 1 tbsp, cold and cut into small cubes
1 egg yolk
2 tbsp sugar
2 tbsp ice cold water
1/2 tsp salt
  • Mix together flour, salt and sugar in a mixing bowl. Cut in the butter with pastry cutter or a fork until the mixtures resembles coarse crumbs. Combine egg yolk and cold water. Mix together until combined.
  • Add egg mixture to the flour mixture and stir with fork to moisten. Flour mixture should come together. Add a little more water if mixture is too dry. Do not over mix.
  • Turn out onto work surface, knead once or twice until dough comes together.Wrap in plastic and chill for 30 minutes.
  • Pre-heat oven to 180 C
  • Dust a work surface with flour. Roll out dough into thin sheet. Lift dough using rolling pin and lay it over a 9 inch pie pan. Press the dough along the edges of the pie pan. Trim, leaving half inch over hang. Fold under and crimp for decorative edge.
  • Prick all over with a fork so the crust won't balloon during baking.
  • Bake at 180 C for 20 - 25 minutes or until golden brown. Let cool completely.

jackfruit filling
1/4 cup sugar (since jackfruit has a sweet syrup I only added small amount of sugar. You can adjust the sugar as you wish.)
1 250 g sweetened jackfruit in can or jar, reserve the syrup
4 large eggs
4 gelatin leaves
1 stick butter, cut into small cubes, room temperature
1 250 g cream
2 tbsp sugar
  • In a blender or food processor puree the jackfruit, add syrup little by little until you reach a thick juice consistency. Set aside.
  • Soften gelatine in cold water. Set aside.
  • Have an instant-read thermometer, a strainer and a blender or food processor at hand. Bring a few inches of water to a simmer in a saucepan.
  • Put the sugar and jackfruit puree in a heatproof bowl. Add eggs and whisk.
  • Set the bowl over the pan and start stirring with the whisk as soon as the mixture feels tepid to the touch. You want to cook the cream until it reaches 180 degrees F. You must whisk constantly to keep the eggs from scrambling - you'll see that the cream will start out light and foamy, then the bubbles will get bigger and then, as it gets closer to 180 degrees F, it will start to thicken and the whisk will leave tracks. Heads up at this point - the tracks mean the cream is almost ready. Don't stop whisking or checking the temperature, and have patience - depending on how much heat you're giving the cream, getting to temp can take as long as 10 minutes.
  • As soon as it reaches 180 degrees F, add the soften gelatin whisk until melted then remove the cream from the heat and strain it into the container of the blender.
  • Pulse once just to blend, then let the filling cool to 140 degrees F, about 10 minutes.
  • Turn the blender to high (or turn on the processor) and, with the machine going, add the butter little by little. Scrape down the sides of the container as needed as you incorporate the butter. Once the butter is in, keep the machine going - to get the perfect light, airy texture, you must continue to blend the cream for another 3 minutes.
  • Pour the cream into a container, press a piece of plastic wrap against the surface and refrigerate for at least 4 hours.
When you are ready to construct the pie, whisk the jackfruit filling vigorously to loosen it. Add bits of jackfruit if you have. Spread the filling evenly in the cooled crust. Whisk the cream and 2 tbsp sugar until double in volume, spread on top of the jackfruit filling and refrigerate to set.
 photo jackfruitpie_zps0af24980.jpg

Spicy Chocolate Beef

$
0
0
spicy chocolate beef 1 photo spicychocolatebeef1_zpse084407a.jpg
Last weekend I saw Jonathan Phang's Caribbean Cookbook in Travel channel. He cooked Spiced beef in a chocolate sauce with cook up rice. I got really curious how chocolate taste like if mix in a savory meal that's why I asked Pieter if he would like to try it as well.
I saw Jonathan's recipe online but the thing was I dont have mixed spice on hand. I can't find in our local grocery here in Holland, in Asian store perhaps but I was too lazy to cycle to go there. So I skip Jonathan's recipe and looked for a simple version, I found one from Allrecipes.com.

Honestly, I don't follow the recipe when it comes to cooking. Sometimes I add few other ingredients or sometimes change it. In this recipe I added cumin powder, parsley, worcestershire sauce and increased the chili powder, chocolate and used cinnamon powder instead of stick. I also didn't add bacon as I don't have on hand, bet it taste even better with bacon. Anyway it was my first time to make this so I really don't know how it supposed to taste like, but my aim is to make it spicy and chocolately taste. 

Ingredients - recipe adapted from Allrecipes.com
4 teaspoons olive oil
2 onions, chopped
150g bacon, chopped
2 cloves garlic, chopped
2 fresh chilli peppers, chopped
1.5kg beef (ideally braising steak)
2 tablespoons flour
600ml beef stock
1 (400g) tin peeled chopped tomatoes
1 teaspoon brown sugar
1 cinnamon stick
1 teaspoon chilli powder
50g plain chocolate

  • Preheat oven to 160 C / Gas 2 1/2. (I cooked it on stove) Heat oil in the pan, cook onion and bacon, add garlic and chilli pepper and cook for another couple of minutes. Move into a large casserole pot.
  • Dice the beef, coat with flour and cook until brown. Add more oil if necessary. Move into a casserole pot.
  • Stir stock into a pan, simmer for a minute and add to the pot together with tomatoes, sugar, cinnamon stick and chilli powder. Bring to boil.
  • Move into the preheated oven and braise for 1 1/2 hours until soft.
  • Remove from the oven, stir in the chocolate, let it melt and serve with rice or mashed potatoes.
    spicy chocolate beef photo spicychocolatebeef_zpsceec6c2f.jpg
    Pieter liked it. He brought some to the office and shared with his colleague because he got curious when he saw the photo I posted in my facebook page. 


  • Mango Shortcake

    $
    0
    0
    mango shortcake 1 photo mangoshortcake2_zps4a9c9868.jpg
    It is really hard to find a decent mango here in The Netherlands. Pieter bought these mangoes last week as I planned to make this cake since last week. But last weekend we visited my parents in-law so I moved my baking plan and I was also hoping that if I keep the mangoes for a couple more days it will get more ripen and sweet. I think I mentioned many times that there is nothing compares to fresh juicy Philippine mango. The soft, juicy, sweet flesh melts in your mouth like a soft pudding. Seriously in times like this I really wish I can buy Philippine mango here in The Netherlands.

    Anyway back to the cake, the mango didn't turned out the way I wanted but the sponge was moist and the fresh cream was properly whipped and sweetened. Usually if I whip the cream it always look like grainy after whipping. This cake was good according to Pieter. Oh well as long as he liked it then I'm happy. Next time I will use canned peaches. You know peaches and cream goes deliciously well together

    mango shortcake 2 photo mangoshortcake3_zps340c90e8.jpg
    I used Cooking with Dog sponge cake recipe AGAIN. Please watch this video for easy step by step procedure including how to frost the cake.

    sponge cake adapted from Cooking with Dog

  • In a metal bowl beat eggs with hand mixer, add sugar at once and beat for 30 seconds. Placed it over the pan of hot water and beat on high speed for 1-2 minutes. If it's warm enough remove from hot water and continue beating.
  • In a small glass bowl combine milk and butter then dip into warm water. Continue beating the eggs on high speed until the mixture is thick and pale and beaters leave a thin ribbon. Switch to balloon whisk and whisk the eggs evenly to set the texture.
  • Sift in flour and fold together with spatula about 30 times. Pour the pre-heated milk and butter to the batter, fold gently about 50 times.
  • Once the batter become glossy and smooth, pour the batter into baking pan lined with parchment paper, then drop the pan lightly on the counter to break big bubbles in the batter.
  • Bake at 160C for 23 minutes.
  • When it's done, drop the pan lightly to prevent shrinking. Invert the pan onto the wire rack and let cool completely.

    filling
    2 mangoes, cut into cubes
    1 1/2 cup whipping cream
    2 tbsp vanilla sugar (add more if you want)
    chopped pistachio nuts (optional)

    After frosting let the cake rest in the fridge for a couple of hours.


  • Coffee Eclairs

    $
    0
    0
     photo IMG_9757copycopy_zps36664147.jpg
    I am really fascinated with beautiful straight colorful eclairs and wondering how the hell I can do that. I tried making eclairs many times but mine always look like a hotdog buns, big and fat lol. Anyway, they were very delicious specially the coffee pastry cream.

    choux pastry - (I half the recipe) adapted from Laura Calder
    3/4 cups water
    85g butter
    2 tsp sugar
    3/4 cups flour
    3 eggs, lightly beaten
    pinch of salt
    milk for glaze
    • Heat the oven to 375 F/190 C.
    • Put the water, salt, butter, and sugar in a roomy saucepan, bring to a boil. Remove from the heat and add the flour all at once, beating until it forms a ball and pulls away from the sides of the pan. Return the pan to the heat for a minute or two and beat to dry it out a little. (Removing moisture will allow the paste to absorb more egg, which will ultimately make the puffs lighter.)
    • Remove the pan from the heat. Beat in the eggs, the equivalent of one at a time, until fully incorporated. (Do not try to add them at once because they can't be incorporated quickly enough, it makes a total mess, and furthermore you may not need all of them.) Mix until the batter is smooth and glossy. Spoon the dough into a piping bag.
    • Mix a bit of milk into any remaining egg (if no egg left, use only milk). Have at the ready with a pastry brush for glazing. Pipe the dough into finger like logs on a non-stick baking sheet, leaving a good 2-inches/5 cm between them so they have room to expand.
    • Brush the tops with the glaze and press any snouts down with a fingertip. Bake for 20 minutes then lower the heat to 180C and bake for another 15 to 20minutes. Cool on a wire rack.
     photo photo6_zps1dd5bd32.jpg
    choux pastry before baking
    coffee pastry cream
    2 cups milk
    1 vanilla bean, split lengthwise
    6 egg yolks
    1/2 cup sugar
    2 tbsp coffee extract (less if you don't want strong)
    pinch salt
    1/3 cup flour
    1/2 cup heavy cream, whipped
    • Put the milk in a saucepan. Scrape the vanilla seeds into the milk and throw in the pod. Bring just to a boil, remove from the heat, cover, and set aside to infuse for 10 to 15 minutes.
    • Beat the yolks and sugar to pale thick ribbons. Gradually beat in the flour. Whisk the milk into the egg mixture in a thin stream. Add the coffee extract and bring to a boil over medium heat, stirring constantly until the mixture thickens.
    • Strain and set aside to cool. Cover with cling film directly on top to prevent a skin from forming. When cool, fold in the whipped cream and transfer to a piping bag with a small tip.
    coffee glaze
    1  1/2 cups icing sugar
    4 tbsp water, more if needed
    1/2 tsp coffee extract
    toasted cacao nibs (optional)
    • Put the icing sugar in a bowl. Mix together the water and coffee extract and stir it in to make a thin icing. Add more water if necessary.
    • Slice the eclairs in half lengthwise. Spread the bottom generously with pastry cream, as if you're making a fat sandwich. Spread the glaze on top of the top piece and lay it on the cream.
       photo photo4_zps45208d4f.jpg 
      ugly shape after baking :-S
      This is my eclairs cookbook not Laura's though. This is the look I want haha you can really see the difference mine was really ugly.

       photo IMG_9759copycopy_zps72ec09d3.jpg
      By the way, I have read that the choux taste even better if you use milk instead of water. I will try that next time.

      Rijstevlaai (Rice Pudding Pie)

      $
      0
      0
       photo rijstevlaai1copy_zps6b5e93d4.jpg

      When I first tried rijstevlaai from one of the famous vlaai seller here in The Netherlands I got addicted to it. But after few times of eating I got bored with it because the more I eat it, the more it taste mass produced to me. Vlaai is a pie made of yeasted pastry and filling. Traditionally found in Limburg a province in the south part of The Netherlands, it is commonly eaten during coffee time.

      Rijstevlaai is really easy to make. If you can make a perfect rice pudding (without scorching it hehe) then you should give this Dutch recipe a try. It can be eaten plain or add whipped cream and shaved chocolate like the more expensive version you can buy at the bakery.


       photo rijstevlaai3copy_edited-1_zps2feece69.jpg
      rijstevlaai - I used 24 cm spring form pan
      dough
      140 g flour
      1 tsp yeast
      50 ml lukewarm milk
      30 g sugar
      1 egg
      30 g melted butter
      pinch of salt
      • In a large bowl dissolve yeast in milk. Allow mixture to sit 10 minutes, or until bubbly. Add the remaining ingredients then mix everything together until you have smooth dough.
      • Put in a warm spot and leave to rise for about an hour. Meanwhile prepare your rice pudding.
      • When your dough has risen, knead briefly and roll it out on a floured surface.
      • Roll the dough out into a circle slightly larger that the baking pan. Line the pan with the dough.
      filling
      150 g dessert rice
      500 to 650 ml full fat milk
      2 eggs, separated
      60 g sugar (more if you prefer really sweet)
      2 tbsp melted butter
      1 tsp vanilla
      pinch of cinnamon
      whipped cream
      shaved chocolate
      • Put the rice, cinnamon and 500 ml milk in a pan and bring to a boil. Then turn down the heat and cook on lowest heat until tender. Stir often to make sure the milk does not burn. Add more milk if necessary.
      • When rice is about to cook add the sugar and butter, mix well. Remove from heat and let cool.
      • Once cooled stir the egg yolks in the rice mixture. 
      • Beat egg whites until stiff and gently fold into the rice mixture. Pour this into the lined pan.
      • Bake at 180 C for about 25-30 minutes.
      • The pastry should be brown and the fillng is set, but still slightly wobbly. It will firm up once cooled.
      • Serve with whipped cream and shaved chocolate.
       photo 1000702_620284331323028_1789487856_n_zps7748f24f.jpg

       photo rijstevlaai2copy_zps7d09a68e.jpg


      Steak, Guinness and Cheese Pie

      $
      0
      0
      pie 1 photo beefandcheesepie1_zpsb2374aa3.jpg
      Last sunday while waiting for our usual weekend movie night to start, I saw this show "The Food Truck" in travel channel. It's about Chef Michael Van de Elzen as he tries to create healthy, restaurant-quality alternatives to NZ fast food from the back of an old truck. The episode was all about pie, he made vegetable pie, fish pie and steak and cheese pie which looks really, really delicious.

      I was looking for a stew like pie filling recipe and I found Jamie Oliver's steak, guinness and cheese pie recipe. At first I thought I messed up because it was really bitter but after simmering for three hours it turned out really delicious, the beef stew was full of flavor.

      In Holland I can't find a decent puff pastry, I bought a pre-cut puff pastry for croissant before but it taste yucky. That is why I've decided to make a pie crust instead. I also cooked the beef stew on the stove not in the oven like Jamie did. The pie was really amazing! buttery, flakey crust and melt in your mouth beef.


      filling - recipe adapted from Jamie Oliver
      olive oil
      3 medium red onions, peeled and chopped
      3 cloves garlic, peeled and chopped
      2 sticks of celery, trimmed and chopped
      2 carrots, peeled and chopped
      4 ounces mushrooms, quartered
      1 kg brisket of beef or stewing beef cut into cubes
      rosemary sprigs, leaves picked and chopped
      sea salt
      freshly ground black pepper
      1 bottle Guinness
      1 cup beef stock
      2 heaped tbsp plain flour
      200g grated cheddar cheese
      500g all butter puff pastry
      1 egg, beaten
      • Preheat oven to 190C/375F/gas 5. In a large ovenproof pan heat a glug of oil on a low heat.
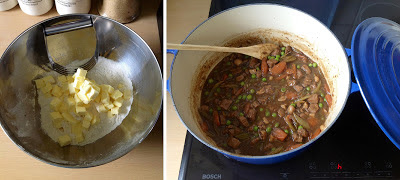
      • Add the onions and fry gently for about 10 mins try not to color them too much. Turn the heat up, add the garlic, carrots and celery. Scatter in the mushrooms. Mix everything together before stirring in the beef, rosemary, salt and pepper. Fry fast for 3-4 mins, then pour in the Guinness, stir in the flour and beef stock. Bring to a simmer, cover the pan with a lid and place in the oven for about 1 1/2 hours. Remove the pan from the oven and give the stew a stir. Put it back in the oven and continue to cook it for another hour, or until the meat is tender and the stew is rich and thick.
      • A perfect pie filling needs to be robust, so if it's still liquidy, place the pan on the hob and reduce until it thickens. Remove from the heat, stir in half the cheese then season carefully and leave to cool slightly.   
      You can make a pie crust if you don't have puff pastry on hand. Make 1 big pie or 3 small ones, your choice.
      • Cut a third off the pastry block. Roll out each piece to the thickness of a pound coin. Line a greased pie dish with the larger sheet of pastry, leaving the edges dangling over the side. Tip in the stew then sprinkle the remaining cheese over. Brush the edges of the pastry with the egg.
      • Cut the other piece of the pastry to fit the top of the pie dish and and criss cross it slightly with a sharp knife. place it over the op of the pie and fold the over-hanging pastry onto the pastry lid to make it look nice and rustic. cook on the bottom of the oven for 45 mins.

      crust - makes 3 - 6 inch pie plate
      2 1/2 cups flour
      2 sticks butter, cold and cut into small cubes
      2 egg yolk
      2 tbsp sugar
      2 tbsp ice cold water
      1/2 tsp salt
      1 egg
      • Mix together flour, salt and sugar in a mixing bowl. Cut in the butter with pastry cutter or a fork until the mixtures resembles coarse crumbs.
      • Combine egg yolks and cold water. Mix together until combined.
      • Add mixture to flour mixture and stir with fork to moisten. Flour mixture should come together. Add a little more water if mixture is too dry. Do not over mix.
      • Turn out onto work surface, knead once or twice until dough comes together. Divide dough into six parts with one part slightly bigger than the other. Cover with plastic wrap. Chill all pastry until firm, about 30 minutes.
      • Pre-heat oven to 180 C
      • Dust a work surface with flour. Roll out dough into thin sheet.
      • Lift dough using rolling pin and lay it over a pie plate.
      • Roll out remaining dough for the top crust. Set aside.
      • Add the filling. Cover with a top crust. Flute or crimp edges together to seal. Cut several steam vents across top. Brush with beaten egg.
      • Bake at 180 C for about 25-30 minutes until golden brown.
       photo beefandcheesepie2_zps6211b784.jpg

      Pieter in The Kitchen: Seared Salmon with Wasabi-Butter Sauce

      $
      0
      0
       photo searedsalmonwithwasabibuttersauce1_zps27c479fa.jpg
      Pieter really enjoyed cooking and every weekend he became more and more adventurous in the kitchen. Of all the food he made this was my all time favorite and yes this was the 3rd time I requested to cook it for me. The sauce was really, really delicious but I kept on pinching my nose because the wasabi was too strong haha.

      seared salmon with wasabi-butter sauce - recipe adapted from Allrecipes.com
      5 fresh salmon steaks
      2 tbsp white wine vinegar
      10 fluid ounces white wine
      1/4 cup minced shallots
      2 tbsp wasabi (less if you don't want too strong)
      1 tbsp kikoman soy sauce
      1/2 cup unsalted butter, cubed
      salt and black pepper to taste
      1 tsbp olive oil, or as needed
      1 cup chopped coriander leaves
      sesame seeds
      lime
      100 g fusilli pasta

       photo step1_zps077bc46a.jpg
      1. Combine the white wine vinegar, white wine and shallots in a small saucepan over medium heat.
      Simmer until the liquid reduced to about 2 tbsp. Strain out shallot and dscard, return liquid to the pan.

      2. Cook pasta according to packet direction. Once pasta cooked set aside.

       photo step2_zps51200ab7.jpg
      3. Stir the wasabi and soy sauce into the reduction in the pan.

       photo step3_zps28be9f5b.jpg
      4. Over low heat, gradually whisk in butter one cube at a time allowing the mixture to emulsify. Be careful not to let the mixture boil. When all of the butter has been incorporated, stir in coriander, and remove from heat. Pour into a small bowl, and set aside.

       photo step4_zps35a2d773.jpg
      5. Heat a large skillet over medium-high heat. Brush salmon steaks with olive oil, and season with salt and pepper. Place in the hot skillet, and sear for 3 to 5 minutes on each side. Be careful not to overcook.

      6. Arrange the pasta and salmon on the plates, pour the sauce and sprinkle with sesame seeds and coriander.

       photo searedsalmonwithwasabibuttersauce_zps1bd9cffa.jpg
      Feed me anything with coriander and you will never go wrong. :-D

      Black Forest Mousse Cake

      $
      0
      0
       photo blackforest1_zps6205b5a8.jpg
      It was 7 years ago when I made my very first black forest cake. I was still living in The Philippines back then. Pieter used to send me a parcel full of Dutch and German goodies and one of them was Dr.Oetker brand. Dr.Oetker is a German company that produces baking powder, instant cake mixes, pudding, yoghurt, frozen pizza and a lot more. My very first black forest was a ready mix chocolate cake from this brand. Does anyone of you know this bonbon with cherry and liqueur inside? That's the one I substituted for kirschwasser haha. 
       photo cherry1copy_zpsb8954b97.jpg
      As I look at the old photos in my blog, I must say that my photography, baking and cooking skills really improved over the years, as well as my black forest. ;-)
       photo cherry_zpsf97c26f7.jpg
       photo blackforest3copy_zps70be0777.jpg
      black forest mousse cake 

      kirsch syrup
      2 tbsp sugar
      3 tbsp water
      2 tbsp kirsch 
      • In a small sauce pan bring sugar and water to boil until sugar dissolve. Turn off the heat and let cool completely. Stir in the kirsch.

      chocolate sponge
      3 eggs
      50 g cake flour
      40 g cocoa powder
      100 g sugar
      15 g butter
      1 tbsp milk
      • Preheat oven to 160 C.
      • Line a baking pan with parchment paper.
      • In a metal bowl beat eggs with hand mixer, add sugar at once and beat for 30 seconds. Placed it over the pan of hot water and beat on high speed for 1-2 minutes. If it's warm enough remove from hot water and continue beating.
      • In a small glass bowl combine milk and butter then dip into warm water. Continue beating the eggs on high speed until the mixture is thick and pale and beaters leave a thin ribbon. Switch to balloon whisk and whisk the eggs evenly to set the texture.
      • Sift in flour and cocoa powder and fold together with spatula. Pour the preheated milk and butter to the batter, fold gently.
      • Once the batter become glossy and smooth, pour the batter into baking pan lined with parchment paper, then drop the pan lightly on the counter to break big bubbles in the batter.
      • Bake at 160C for 23 minutes.
      • When it's done, drop the pan lightly to prevent shrinking. Invert the pan onto the wire rack and let cool completely.
      • Slice the sponge in the middle, place one slice into the mold (I used 7 inch mold). Set aside.

      chocolate cream (recipe adapted from Daily Delicious)
      80 g dark chocolate, chopped
      2 egg yolks
      15g sugar
      85 g whole milk
      100 ml whipping cream
      • Bring milk to boil. Beat the yolks and sugar until combine. While whisking pour hot milk over the yolk mixture then return the mixture into the pan and cook over low heat. Continue whisking until it reach 80 C.
      • Place the sieve over the bowl of chocolate, when the yolk mixture is ready pour the mixture through the sieve and wait for 1 minute. Stir until the chocolate is melted. Let it cool down to room temperature.
      • Whip the cream until soft peak. Spoon 1/3 of the cream into the chocolate mixture and fold gently to combine.
      • Pour the chocolate mixture back into the whipped cream and fold gently to combine.
      • Brush the sponge cake with kirsch syrup. 
      • Pour 1/4 of the chocolate cream over the sponge and arrange the cherries (make sure your cherries are fully drained) then pour the remaining chocolate cream. Place the 2nd sponge on top, press gently.
      • Cover with cling film and place in the fridge for 2 hours or until firm.
       
      kirsch flavored whipped cream
      1 gelatin leaf
      1 vanilla bean
      280 ml whipping cream
      20 g sugar
      20 g kirsch (more or less if you want)
      • Soak the gelatin leaf in cold water.
      • Cut vanilla lengthwise and scrape the seeds.
      • In a saucepan combine 80 ml whipping cream, sugar, vanilla and bring to boil. Turn off the heat and stir the softened gelatin until melt. Set aside to cool down.
      • Once cooled down add the rest of the cream and the kirsch and whip until soft peak.
      • Take out the mousse cake from the fridge and brush the sponge cake with kirsch syrup.
      • Spread the whipped cream evenly, cover with cling film and return in the fridge to set.
      • Add shaved chocolate and more cherries on top before serving.
       photo blackforest2copy_zpsfea18f7f.jpg

      Alma's Chili Garlic

      $
      0
      0
       photo chili_zps7be0b7dd.png
      This chili garlic is super delicious with noodles and dimsum. But I must warn you that the bird's eye chili is indeed spicy. You can remove the seeds to reduce the spiciness (just a little) or better yet start with milder chili. And please don't forget to wear hand gloves and do not touch or rub your eyes during or after handling chilies.

      alma's chili garlic
      50 g bird's eye chilies
      1/2 of 1 small onion, chopped
      4 garlic cloves, chopped
      1 tsp sesame oil
      6 tbsp sunflower oil or more (I like mine submerge in oil)
      1 tbsp sugar
      1/2 tbsp soy sauce
      • Put everything in a food processor. Blitz until the garlic and onion are finely minced.
      • Transfer to a frying pan, cook over medium heat while stirring, lower the heat and cook gently for about 3 minutes be careful not to burn it.
      • Remove from the heat and set aside to cool. Transfer to a jar and store in the fridge.
      Haha toxic according to my husband.

      Busy Playing

      $
      0
      0
      This is what I've been doing lately. :-D
       photo image_zps6d735231.jpg
       photo image_zpsb3f8984e.jpg
       photo image_zps173c516d.jpg
      Still long way to go.
      Viewing all 94 articles
      Browse latest View live


      Latest Images